

Make Your Own Soy Wax Melts
- The GREY Collection Ltd

- Oct 8, 2020
- 4 min read

I’ve been making candles for the last year and after a million failed attempts I have been able to create a process that provides a scented candle that I can actually smell.
The Grey Collection candles come in range of aluminium tins; but the most exciting product to make are wax melts. In all honesty when comparing my candles to other candles I am not that adventurous or artistic with my candle designs as my Unique Selling Point is the fragrances. When making candles I always struggle with creating aesthetically alluring artistic candle designs. Which is why I enjoy making wax melts as this is the only time my candles look as beautiful as they smell and it affords me the opportunity to be a little creative by adding botanicals and or colours.
Although new to the candle making business my main aim has always been to create a uniquely scented candles with a really good hot and cold scent throw.
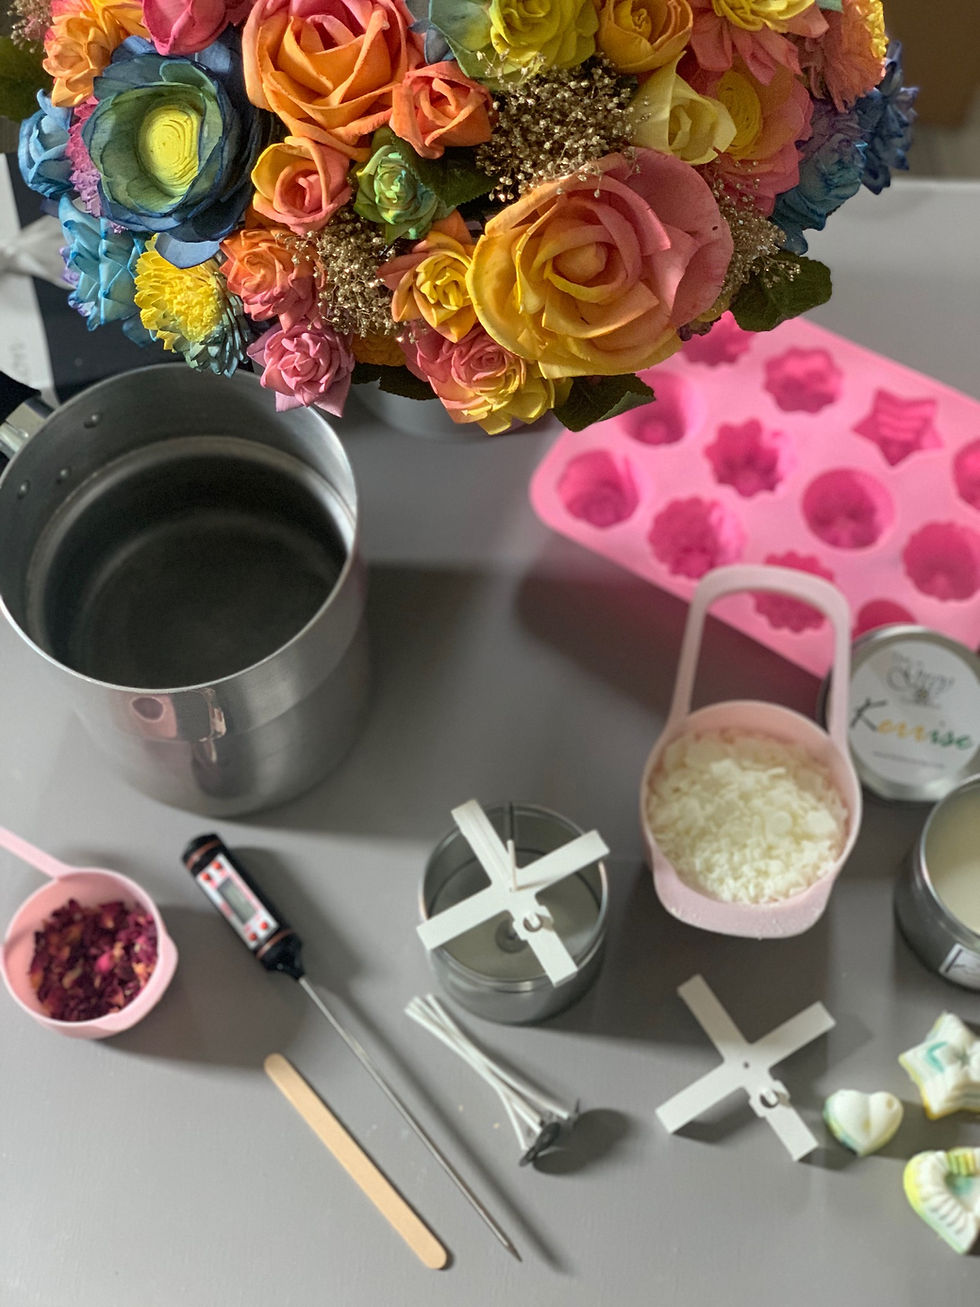
So, with that let’s start with the essentials our equipment;
Equipment List
Affiliate Links are included – (Please note that As an Amazon Associate, I earn from qualifying purchases)

· 1 x Thermometer
· 2 x Double Boiler
· Plain Lollipop Sticks
· Soy Candle Wax
· Fragrance Oil
· Candle Tin, Jar or Silicone Mould
· Hair Dryer or Small heater
When I first began making candles, I utilised a Candle Kit I found on Amazon which provided me with the basic Kit needed to make a paraffin pillar candle. However I wasn’t overly fond of the results so after reading the 4Candles website regarding wax selection I opted to switch to Soy as a more natural alternative.
One of the most fundamental pieces of equipment is the Thermometer. The delicate nature of making candles means that adding the fragrance when the temperature is either too hot or too cold can result in a candle with no Cold and/or Hot throw. I initially didn’t use a thermometer as I struggled with the thermometer provided with the kit. This meant my initial candles were all based on a wing and a pray but after using websites like candle-shacks how to guide on my path to make the best candle I could, I began using a thermometer to ensure the best results.
Instructions
Step 1

Collect all the necessary equipment, and measure the Candle wax, and fragrance oil and set aside.
Step 2
Next prepare your candle vessel or silicone mould. When using Tins or a Glass vessel I like to Wick my Tins before I begin heating the wax. Similarly, when making wax melts and adding Botanicals such as Lavender or Rose Petals I like to prepare the moulds at the start.
Step 3
Next prepare the scent. I use approximately 7% scent or 20ml per 175g candle or per mould which take approximately 200g of wax each. I usually make six candles or 2 moulds at a time, so need 120ml of scent per pour for the 6 candles or 40ml for the 2 moulds.

It is important to check the recommended fragrance load for the type of wax you use. If you use more than the recommended about without the addition of additives such as Vybar. The wax may not be able to hold the fragrance in suspension resulting in 'wet spots' where the fragrance has puddled.
Step 4
If you don’t have a Double Boiler you can create on by filling a pan with water to be used as your base pan and turn on the heat. Add the wax to a second slightly smaller pan and place inside the base pan and wait until this has melted at approx. 65C/180F.
Step 5
As noted above when making candles, the temperature at which you add the fragrance to the wax can significantly affect your candles performance. Too cold and the fragrance won’t mix and blend with the wax. Similarly, if you add the fragrance when the wax is too hot, then the fragrance could dissipate, burn off and evaporate.
There are a number of recommendations for when to add your fragrance oil, for the Soy wax I use the recommended temp is 57.2C(135F). However, as I create my own scents, I find these need a much higher temperature to fully blend with the wax and as a result I usually add the fragrance oil at between 185/180 degrees Fahrenheit.
Step 6
Once the wax has reached the required temperature of 185/180F add your fragrance oil ensuring you continuously stir whilst the wax cools to the required pour temperature.
Not only does the temperature of wax affect the scent throw but also the candles finish and performance.

Step 7
To prevent excessive shrinkage from the wax cooling to quickly. When making Tin candles I like to ensure the room temperature is from very warm to hot to slow the cooling process down and that the containers are at least 1/2" apart to allow for proper air circulation and even cooling.
However, whilst this works with my tin candles, I found this created wax frost on my wax melts. To mitigate against this, I move the wax melts to a slightly cooler room to speed up the cooling process but this does have the knock-on effect of causing the base of the melts to sometimes concave which I cover with a second pour.

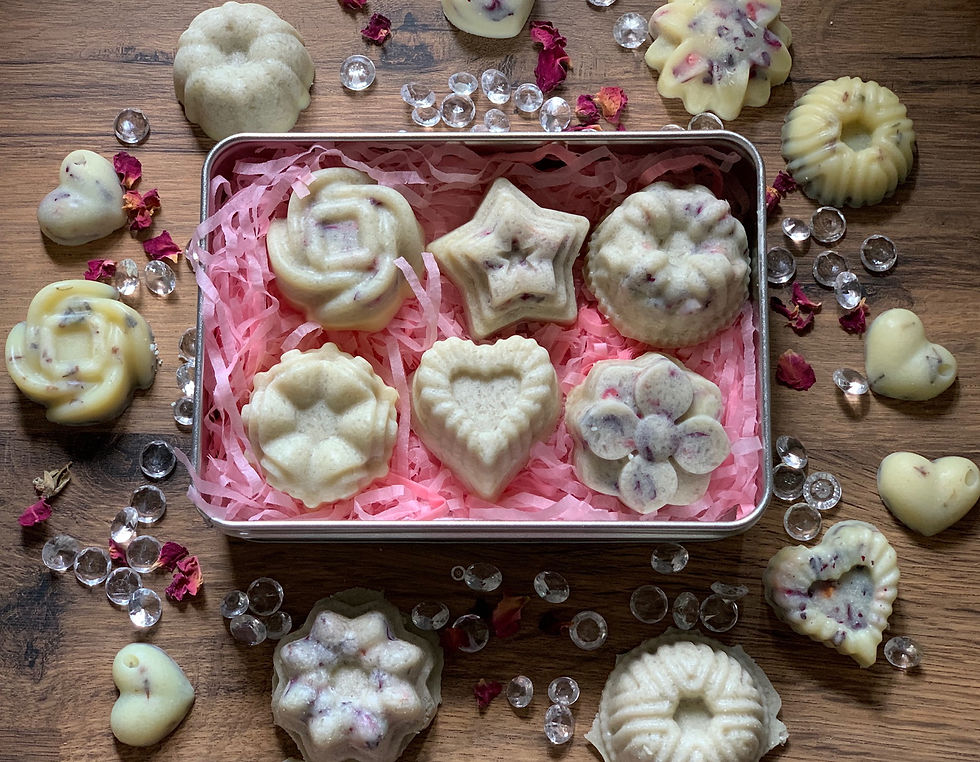
Step 8
Once the moulds are cool, gently remove each melt and place on a tray lined with greaseproof paper and allow to rest for at least 24 hours - longer for really large ones. Allow the candles and or melts to 'cure' for at least 48 hours before test burning.
Step 9
All that’s left to do is remove any excess wax to make sure there are no wax drips and that the base of the melt is smooth. Then package/box them up, and apply the stickers ready to be distributed.


Comments